
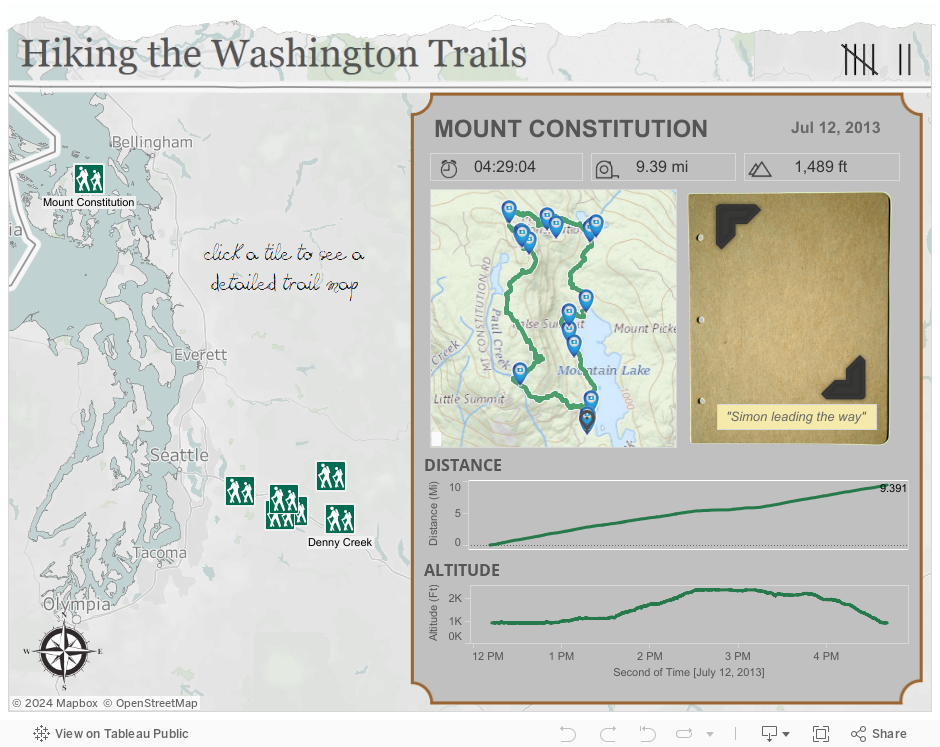
Since moving to the Seattle area in early 2013, we’ve been doing our best as a family to tromp our way through the lush, scenic trails around us, guided by a helpful little orange book entitled “Best Hikes with Kids: Western Washington & the Cascades“. At first, my gentle suggestion (read: stubborn insistence) to hit the trails was met with some light resistance (read: outright mutiny) from my two iPad-wielding boys, but not so much any more, I’m happy to say.
Being a data guy, I wanted to track our every step through the Pacific Northwest, so I downloaded an app for my iPhone called Backpacker GPS Trails Pro. It’s great – it tracks our coordinates and lets us capture photos or video along the way, among other things. The default dashboard on TrimbleOutdoors.com is nice and all, but, well – I told you I was a data guy – I wanted to make my own.
First, I’ll show you what I made to track our treks, and then I’ll show you how I managed to go from GPS to viz in 7 steps.
How to go from GPS to Viz – 7 Steps
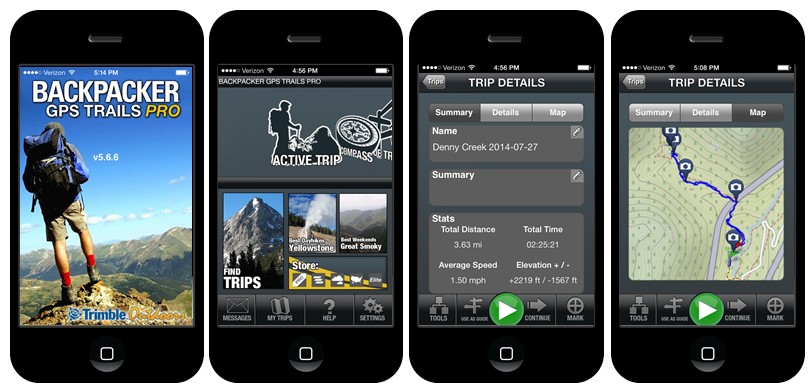
STEP 1: RECORD the trip & SYNC the app
This is the best part. Get out there, enjoy the trail, and make sure to hit the start button on the app. Here are some screen shots from a recent trip we took:
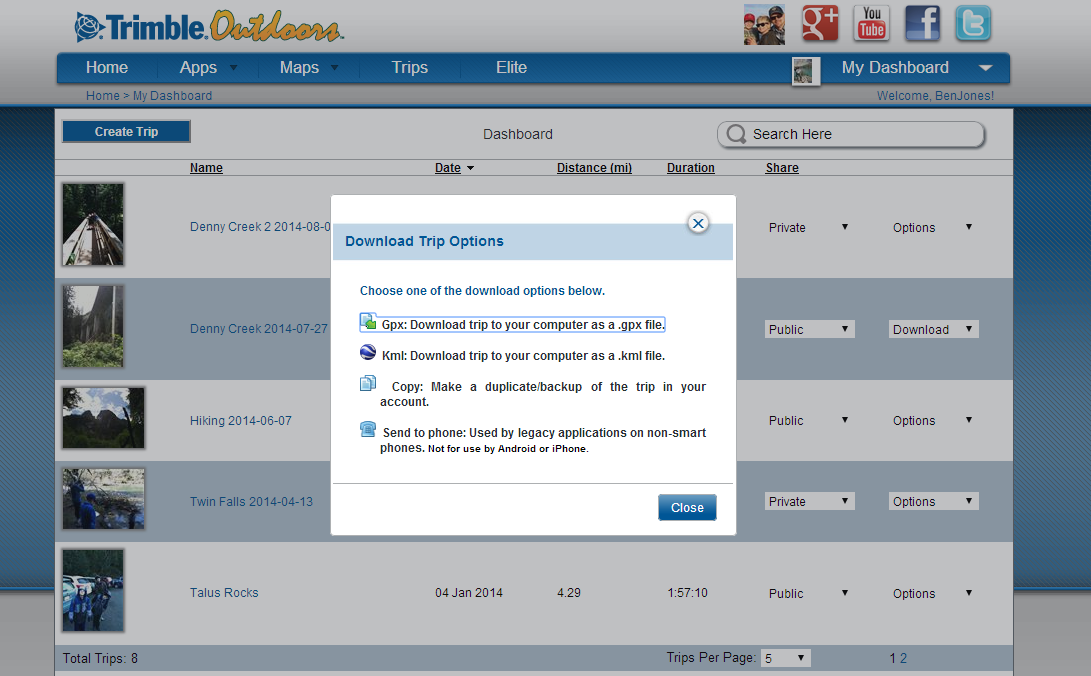
STEP 2: DOWNLOAD the data in .gpx format
First, I had to log in to my account on TrimbleOutdoors.com. You may have a different GPS app, which is fine, but just make sure it’s one that allows you to download your data. If your app’s site lets you get the data in spreadsheet form, all the better. Mine didn’t, so I had to first get the .gpx file. Here’s a screenshot of the download page:
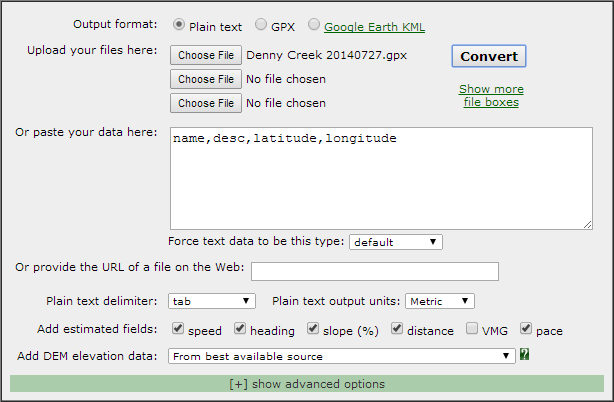
STEP 3: CONVERT the .gpx file to .txt
Next, I had to get the data into a text file, which was quite easy to do once I found a useful site called GPS Visualizer. It’s free to use (they accept donations), and you just indicate that you want a Plain text output, choose the .gpx file from your Download folder, check the boxes to add estimated fields, and Convert. Here’s how that looks:
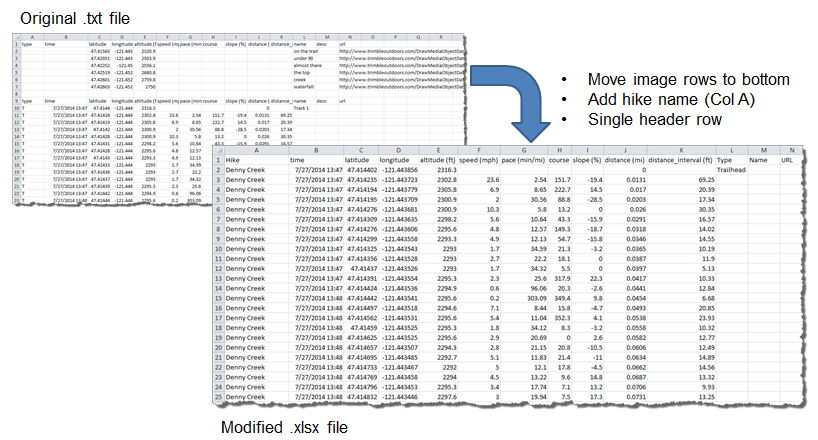
STEP 4: CLEAN UP the data spreadsheet
This step involves opening the .txt file from step 3, getting rid of any header rows, moving the multimedia files to the bottom of the list, combining multiple .txt files into one spreadsheet and giving each its own unique hike name. Here is a screenshot showing the original .txt file and the fully formatted spreadsheet:
STEP 5: CONNECT Tableau to the cleaned up .txt file
Open Tableau Desktop (or Tableau Public), and click “Connect to Data”, select Microsoft Excel, navigate to your hike spreadsheet, drag the sheet into the middle area, and then click “Go to Worksheet”.
STEP 6: CREATE your viz
Use Tableau’s UI to drag and drop your data fields onto the canvas and create Sheets, Dashboards and Stories. I used a few advanced features in this workbook, including:
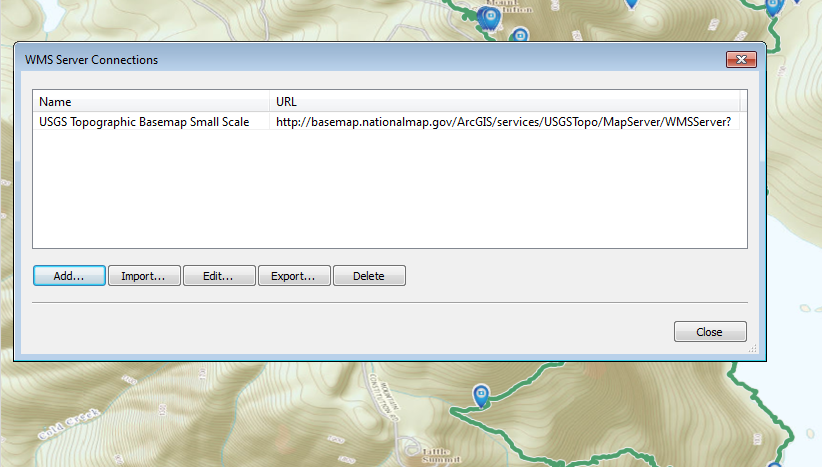
- A Custom WMS (only works with Tableau Desktop) from USGS – US Topographic Basemap. Click Map > Background Maps > WMS Server, and enter: http://basemap.nationalmap.gov/ArcGIS/services/USGSTopo/MapServer/WMSServer?
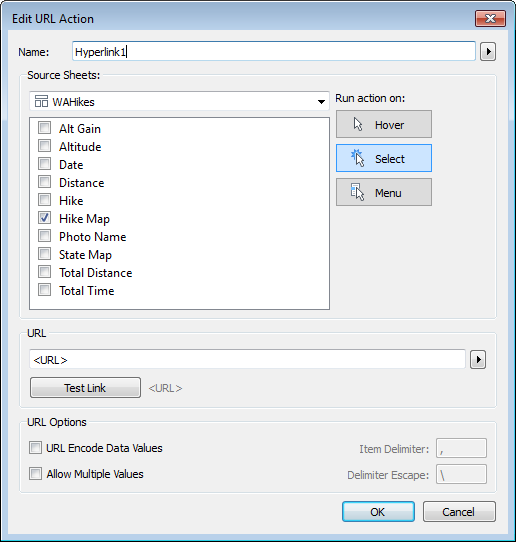
- A web page object on the Dashboard that dynamically links to each hosted photo on TrimbleOutdoors.com based on the URL column in my data. Note that I also changed the size of the photos since the large images took a long time for the Trimble Outdoors servers to load. Smaller photos were obtainable using a URL parameter (“?size=Size265x180”). Drag a web page object onto the dashboard, click OK, and then select Dashboard > Actions > Add Action > URL and fill out the dialog box as follows:
STEP 7: PUBLISH to Tableau Public & EMBED in your website
Can’t get much easier. Click Server > Tableau Public > Save to Web as… (or in Tableau Public, File > Save to Web as) and copy and paste the embed code into your CMS.
The Last Leg
This was a fun personal project that I made for my boys, so I took some extra steps to add design elements to the dashboard. I was shooting for a hand-made / trail map / scrap book feel, hence the hand-written font instructions, compass image, photo corner tacks, tally mark image, etc. The mountain shape cut-away at the top of the viz is actually from a photo of the Olympics here in Washington, so I tried to stay true to the territory with each design element.
Let me know if you make good use of this tutorial, and if you have any other questions about how I made it.
Thanks for stopping by, and happy trails!
Ben

That’s funny, I had recently started creating a similar viz for tracking my runs: https://public.tableausoftware.com/views/TimothyAllRuns/Dashboard?:embed=y&:display_count=no
Also based on GPX files gathered with apps such as Runkeeper, Movescount, iSmoothRun, …
I like how you have the ability to add photos to the dashboard!
Very cool, Timothy. Are you also converting GPX to text the same way as me, or are you doing something different to get the data into Tableau?
Hi Ben,
Yes, more or less. Actually, as the GPX files are basically XML, I just use an online XML to CSV converter. However I do need some information that is stored in nested tags (cadence, heart rate, …). I found that this converter works pretty well for this: http://www.luxonsoftware.com/converter/xmltocsv
I’m assuming your process is similar?
Timothy,
Super cool viz! I have thought about doing something of this sort with the data that I collect with Strava but haven’t looked into pulling out the data yet.
Hike on!
Super cool! Any reason this wouldn’t work for boats in the middle of the ocean?
Hi Krystle, thanks, and yes, I believe you could do something very similar for boats in the ocean. All you need are lat/long coordinates and an image URL for each pair. Also reach out to Andrew Cheung (@AndrewCheung88) at Tableau as he is both an avid sailor and a viz builder and might have some ideas for you.